If you like the work I do on this blog, please consider supporting it via my Patreon or a one-time Ko-fi tip, or by shopping through the Amazon affiliate links in this article.
It’s paint maintenance time for me, and that is a good opportunity for me to share some pictures and tips to help you maintain your own stash of miniature paints.
The most important tip is: Never let your paint freeze! Miniature paint will ‘curdle’ if it freezes. There is no way to restore paint that has been frozen to a correct and useable consistency.
Helpful tip: If you have hard water or any other water issues, use distilled water rather than tap water to add to paint bottles.
Helpful tip: This is the messiest job in miniature painting! Wear old clothes and protect surfaces with table cloths and drop cloths. Trust me on this! You will need much more paper towel or cloth than usual to clean brushes and wipe up spills.

Two common issues that paint experiences over time are thickening up as water evaporates from inside the bottle, and paint separating into thick gloppy pigment at the bottom of the bottle, with watery components of the mix floating on top. Both of these issues can be remedied if caught quickly enough. Note that metallic, satin, and other texture effect paints are more likely to experience these issues, and to experience them after shorter periods of disuse.
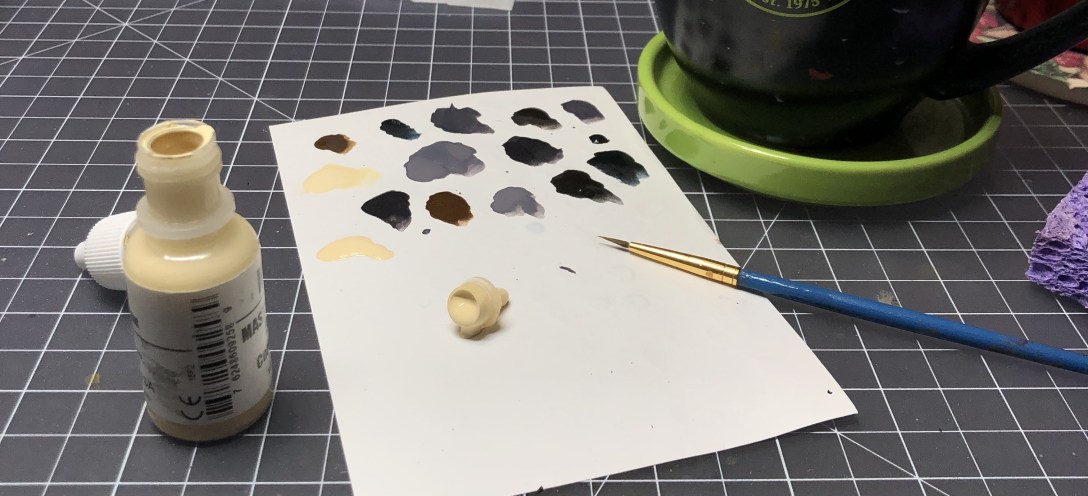
To best preserve the quality of your miniature paints, do a maintenance check every 1-2 years. Shake the paint as you would for normal use. Dispense a drop of the paint and check its consistency. I use index cards for my paint drop tests. After dispensing the drop, I run an old paint brush through the drop to check consistency. Remove dropper bottle nipples to observe the paint within the container if you have any doubts. Add distilled water to paint that is thickening and shake. You will have to STIR, and then shake paint that is separating or is very thick in consistency. I’ll go over the method and possible issues in more detail below.

Paint stored in containers that are not moved or shaken for long periods of time can start to separate. The heavier pigments and binder elements sink to the bottom and lighter elements of the binder float to the top. You can see an extreme example of the issue very clearly above in a screw top paint bottle that doesn’t have a label on the side. It can be much harder to spot in containers made of more opaque plastic or which have large obscuring labels.

One reason I suggest dispensing a sample drop of paint for dropper bottle maintenance is to detect paint separation issues. You will see something like the above – a very watery mix of paint. Usually the colour looks quite pale or faint as well. If I see this, I pop off the nipple of the dropper bottle. I try to pick up this watery mix with a brush and add it back to the bottle, but it’s not a big issue if you lose a drop or two.

If paint has separated to this degree, you will need to STIR it to repair the issue. You cannot guarantee redistributing the watery binder elements and chunkier pigment bits with any amount of shaking alone. Not even with a vortex mixer, not even with agitators in the bottle. I took the picture above AFTER agitating the paint pot (which contains a pewter agitator) on a vortex mixer. The paint looked mixed, but when I checked it with a toothpick, there was sludge stuck to the bottom and sides of the container. Also note the number of bubbles, which is another sign that the fluid portion is still more binder than pigment.
Click to see the vortex mixer in action on a couple of paints. Note that paint in the second half of the video is the same one in the previous picture. I had to stir well and then mix to return it to useable condition.
You will need to use a tool long enough to reach the bottom and sides of the container to get the sludge moving. Toothpicks can work with squat jars, but they break easily and can be fiddly to handle. Sturdier options that also work with taller bottles include plastic swizzle sticks and paint brush handles. The ideal option is something flat, for the same reasons flat wooden stir sticks work well with wall paint. A flattened blade shape stirs well and works better to scrape thickened paint off the sides and bottom of the container. You can scrape each side of a flat shape against the neck of the container to waste as little paint as possible. I recently started using flat strips of metal from old windshield wipers that a Patron kindly sent to me, and they are far superior to toothpicks and swizzle sticks. These Tamiya stir sticks are designed for paint stirring and dispensing. I found several listings for similar products that also come with paint mixing trays and pipettes that would be handy for airbrushing. Stainless steel paddle stirrers designed for beverages have a flattened end that works well for mixing, but the handle is round so they won’t scrape clean as easily.
Once you’ve got the sludge moving, shaking should work to finish mixing everything back together. Then check the consistency again and add some additional water if needed. Eventually you should reach a consistency like the picture below. Note that there are far fewer bubbles now.

Paint can thicken up over time due to water evaporation, without experiencing separation issues. Few containers are completely air tight. It can take years, but water does evaporate through plastic bottles and jars. Sometimes this happens more quickly than you would expect. You can have a set of paints that you purchased at the same time where some bottles are fine and some have experienced more evaporation, so you need to check each paint individually. Below you can see an example of what paint that has thickened up but not separated looks like. Kind of like frosting. (Don’t eat the paint-frosting!)

This can happen with dropper bottles, as well. Dropper bottles also often exhibit a similar but slightly different problem. When you dispense a drop of paint and find that it is very thick, you need to pull out the dropper nipple to check on the paint. You will often find thickening paint clogged up in the nipple tip and/or neck of the bottle, as in the examples below.

Usually there is a separate pool of paint at the bottom of the bottle that may or may not be experiencing thickening as well. Use a toothpick or paint brush to poke the paint down into the bottle, moving it from the nipple to the main area of the bottle. I recommend stirring this bottle neck paint into the paint in the body of the bottle. Shaking may not be enough to intermix the thicker paint into the rest of the paint. Add a few drops of water, and mix thoroughly. Then check the consistency again. If it is still a bit on the thick side, add more water and shake again.
I have been experimenting with something I think helps reduce the incidence of paint getting trapped in the neck of the bottles. Before I recap a paint, I check to make sure that the dropper hole is clear of paint. Paint bubbling or oozing up through the dropper hole when a bottle is opened or after you poke the dropper hole open is another sign that some paint may be stuck in the nipple or neck of the bottle. I use a pokey tool to open up the dropper hole until it stays clear. Other options to open clogged dropper holes are a T-pin, hat pin, or unfolded paper clip.

The paints in the following picture were all discontinued in 2010, so I can verify that they’re old paints. Because I’ve taken the trouble to maintain them every few years, they’re all still in useable condition so I can continue enjoying these no-longer-made colours.

Metallic and Silk/Satin Paints
Paints with metallic flake and similar agents seem more prone to experiencing issues with separation and thickening more quickly than standard paints. They also seem to reach the point of no return more quickly. I recommend doing maintenance on those kinds of paints at least yearly. If you do not maintain these well, accept that they will become unusable more quickly than standard paints.
Container Maintenance
Dropper bottles rarely experience issues other than paint drying in the dropper hole. Occasionally you will get some paint gumming up the lid that you might need to wipe or chip out. With pot style containers, you need to check the threads of both the cap and pot. Over time these often fill up with paint. As this paint dries it can break into chunks that fall into the wet paint. It can also make it more difficult to close the container or affect the seal and allow air into the pot. You can see an example of paint dried up on the inside of a cap below. As I did maintenance on these paints, I chipped paint out of the caps with the metal tool.

Mixing Machines and Agitators
Some paints are harder to mix than others. The more viscous a paint, the more it will need an agitator and heavy shaking or even stirring to mix well. Different binder mixes may also affect how much mixing a brand or colour of paint needs. Some paint brands ship with an agitator in the bottle. All paints produced by Reaper Miniatures do. If you wish to add agitators to your paints, keep in mind that you need to use a non-reactive material. Many materials can rust or oxidize when stored in a liquid paint for long periods of time, even if they would not in other circumstances. Safe materials include pewter and glass beads. Hematite beads are a great agitator option as they are both very heavy and non-reactive. Although you will often see them recommended in online chats/forums, I do not recommend adding lead or stainless steel agitators to paint pots.
There are an increasing number of paint mixer gadgets on the market, and you may also come across ideas for homemade versions on various social media platforms and forums. I’ve seen electric stirrers. Some people have adapted nail polish shakers to this purpose. Many people purchase second-hand laboratory vortex mixers on eBay and other sites to use for mixing paint. (Do a search for ‘vortex mixer’.)
If you have a small collection of paint that hand-mixes fairly easily, like Reaper paints, you may not need any such tools. I purchased a used Vortex Genie 2 lab mixer on eBay a few years ago. Although it was a fairly expensive purchase, I have never regretted it, and it gets more use than many of my other bespoke hobby tools do. I have hand and wrist issues, and a pretty sizeable collection of paint. Paint maintenance was very tough on my hands, even spread over several days. Paint maintenance and day-to-day mixing are much less annoying for me with the mixer.

Unlike you, I do use and recommend lead shot for agitators. It’s much more dense than pewter or hematite, so it will move through the paint well for mixing. I’ve never seen any evidence of degradation or corrosion in my agitators. I use 3/0 shot for this.
Definitely do no use stainless steel. It is designed to resist corrosion in air, not in a fluid. I’ve seen stainless steel rust in paint. If you don’t want to use lead, hematite beads are a decent alternative. I use Reaper paints a lot, and the agitators help, but IME, they are too small and too low density for efficient mixing when the paint starts to go gloopy.
Also IME, if you’re mixing paint with a vortex mixer and you can hear the agitator rattling around, the paint is almost certainly fine. (Though it’s just possible that it’s beyond or nearly beyond saving. If the paint has turned into a plastic plug in the bottom of the bottle, any agitator will rattle nicely without disturbing that plug.)
I have come to the opinion that paint should be stored upright so that the nozzles don’t clog with precipitating pigment. Dropper bottles tend not to mix whatever is up in the neck of the dropper tip well at all. This is less convenient for me than being able to see the bottom of the bottle, but such are the vicissitudes of life.
I have also begun smacking paint bottles down on their bottoms after shaking and immediately before opening them, which seems to reduce the amount of paint that oozes out when I open the bottle. This has been particularly effective in reducing problems that arise with Golden Fluid Acrylics.
LikeLiked by 1 person
I have used and like hematite beads also. Thanks for the info!
LikeLike
Thank you for the write-up Wren. I’ll be sure to link people with questions about paint care to it.
I’m a big fan of hematite beads. Use them in all my paints. I used to use lead beads, and am unsure if lead is good or not, but I’ve never had any reason to worry about hematite beads. They’ve been great.
Also a massive fan of vortex mixers. As someone with joint and bone issues, it’s been a huge help.
LikeLiked by 1 person
I like the hematite beads too. I should try to get some more of them!
LikeLiked by 1 person