If you like the work I do on this blog, please consider supporting it via my Patreon or a Ko-fi tip.
If you look at the home page of this website, you’ll see a subtitle of ‘Art in many forms’. My wonderful husband wrote that when he was helping me set up the page. Our expectation was that I was going to be talking about my adventures trying to learn traditional art forms as well as miniature painting. In practice I’ve only talked about traditional art a couple of times. One was a post about measuring your progress at learning a skill by more than just your end result. The other was about artist challenges and prompts.
 If you need a miniature fix right now, I posted additional photos of the first bust I ever painted over on my Facebook page.
I have wrestled with whether to include more information about my traditional art study in my blog. I was concerned that it would disinterest people primarily interested in miniature painting. But the reality is that my study of traditional art is having a lot of impact in both how I paint miniatures, and in how I teach others about miniature painting. Experiencing the struggles of a student again is very helpful to me in learning to be a better teacher. And reflecting on my journey through miniature painting is helping me become a better student of both traditional art and miniature painting.
A week ago I attended an afternoon workshop for alla prima oil painting. Alla prima means to paint all in one go while all the paint is wet, rather than painting in layers or stages. Wetblending vs layering/glazing in miniature terms I guess. ;->
 Photo of a cave painting by Clemens Schmillen courtesy of Wikimedia Commons. Early humans used ochres as pigments, and we still do today.
But first the class started with learning a bit more about the paints we were using, and some general colour theory information to help us mix the colours we would need to paint the subjects of our paintings. We used a split primary palette, with some additional earth tone colours. Earth tones are reds, yellows, and browns that were originally mixed from minerals and were the first paints.

The split primary palette we used in the workshop is shown above. On the top row are the primary colours, with a cool version of each on the left, and a warm version of each on the right. Down the left hand side are the three earth tones we had on our palette. You can match earth tones by mixing from primaries, but many artists find it convenient to include a few in their palettes for various reasons. Our palette also included white, but we mixed our own black rather than using a pigment black paint. You can see the mix on the right edge of the paper – ultramarine blue and burnt umber (or burnt Sienna) make a great chromatic black. (A chromatic black is something that mostly looks black or can function as black but is made from colour pigments and might have some colour undertones to it when thinned down. They are less dull than true pigment blacks, but may behave differently in mixes.)
You can experiment with painting miniatures with a similar palette by picking out colours like these from your paint collection. They won’t mix exactly the same way these single pigment artist colours would, but you can do more with them than you might realize. (I’ve written an article with a lot of information about paint and pigments for miniature painters.)
 This is a split primary palette (plus a few extras) that I used to paint the award winning figure Promenade. My very scientific method of colour selection was to pull a warm and cool version of each primary colour from a box full of convention paints.
I will confess that I got a little impatient with this segment of the workshop. I have been studying colour theory for years. I’ve got a ways to go in mastering the application of the knowledge, but my understanding of the key terms and basic theory is pretty solid at this point. I would far rather have had more time painting, and chafed a bit when student questions caused this segment to go longer than the instructor had planned.
And yet at the same time, I did learn something – I learned that I really have learned a lot about colour theory! I mention this to give any of you struggling out there some hope. In the early days of study, I struggled to keep terms like hue and value straight in my mind. I had trouble deciding whether a colour was warmer or cooler. It was very difficult for me to determine whether a given brown was really more orange or green or what. I still have plenty of struggles with colours, and more struggles will come in the future, I’m sure. But I was stoked to realize just how much I have learned, and that I am beginning to be able to apply that knowledge in practice. (When we got down to mixing, I had fewer difficulties getting the colours I wanted than I had with my first attempts!)
This moment goes back to stuff I mentioned in that measuring progress post. We have a tendency to focus on what we’re struggling with and what we feel we have not yet learned. We tend to minimize or completely overlook moments of mastery in things that we have successfully learned. If you’ve been painting for more than a few months, I guarantee that there are things you do with ease or even unconsciously now that were a struggle or required immense concentration for you when you first started. You have learned, and you have succeeded. Give yourself credit for that!
 There is a lot of useful colour theory reference material on a simple Pocket Color Wheel!
I also learned something that will be useful to trying to teach people about colour in the future. The instructor had a simple and effective way to think about which primary colours to use to mix the most vivid secondary colours. When using a split primary system, you have a cool and a warm version of each of the primaries. So you have a greenish yellow and an orangish yellow, an oranger red and one that’s more violet/magenta, and a warmer blue that has a touch of yellow in it, and one that is more purple and has a touch of red in it. To mix the most saturated version of each secondary, choose the primary closest to it on the colour wheel. So for orange, you would want your warm red rather than one which is more magenta/violet, and your warm yellow rather than one that has a hint of green.
Finally we got down to painting! And then I was fully a student, struggling to learn and apply each of the stages in a very short amount of time. I think we had maybe an hour and a half of painting time. That’s not a lot of time to mix colours, draw out the subject, and slap paint on everything. Though plenty of the people in the workshop got further along than I did, so I guess I’m just as slow in other forms of painting as I am at miniature painting! A lot of the issue is that I’m still learning to draw, so getting things remotely in proportion and correctly placed and so on takes time and concentration on top of the issue of learning to manipulate paint. Things go slower when you’re learning and when you’re focused. But you learn more when you slow down enough to focus and really concentrate on what you’re doing. So take it easy on yourself if you find that’s what you need to do with new miniature painting skills.
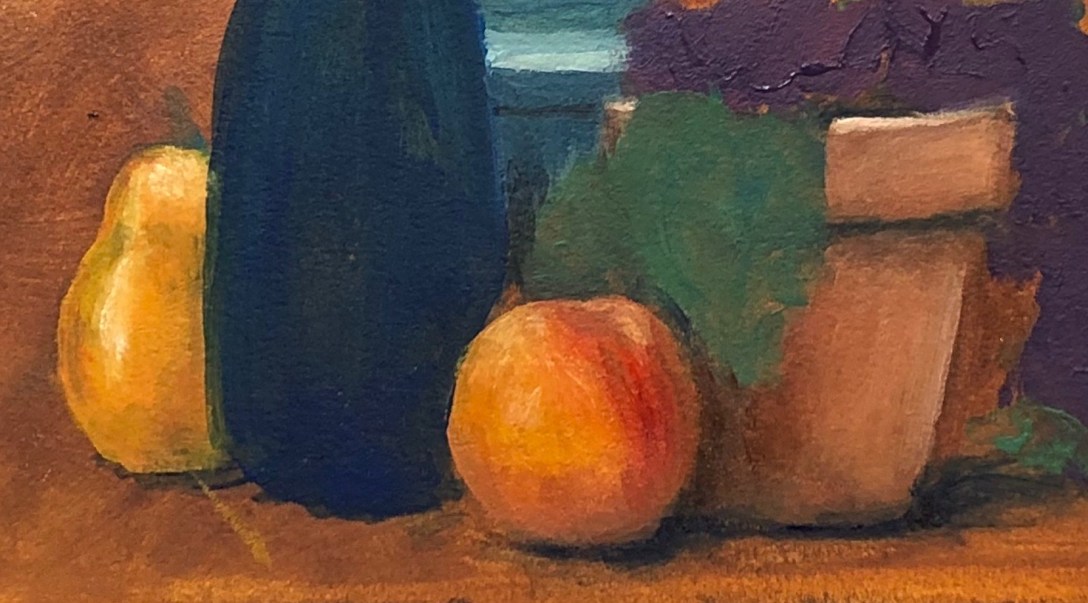
 This is as much of the painting as I was able to complete during the workshop. Thanks to the miracles of science, this painting was made with water-soluble oils, which were applied onto paper treated to accept oil paints. Science so fun it’s magic!
This experience has also given me a renewed sympathy for students of my miniature painting classes who are racing to get through the hands on portion in 45 minutes while I’m continuing to spew more information in the background. :->
I really enjoyed the approach, and I hope that I’ll have the time (and more importantly the focus) to sit down and practice with it. I’m debating finishing up the painting since I took a reference photo. I’m okay if I don’t do that, though. It’s okay to do some things for practice. We don’t have to make a finished piece out of every single thing we work on to get value out of the piece and the time we put into it.
