Ko-fi tips help keep this content free. Patreon supporters receive PDFs with high res photos.
In the miniature community we use the term freehand to describe using paint alone to create patterns/pictures/textures on flat surfaces. (In contrast to when those details are sculpted directly into the surface and we are using paint to bring out the sculpted details.) I have a previous article on freehand that discusses considerations for subject and colour choices.
Today I want to share some suggestions for how to prepare to paint freehand, and some tips for the actual process. I’ll also give an example with some work-in-progress pictures from the Baran Blacktree figure. (In a previous Baran Blacktree article I talked about weathering and colour temperature in non-metallic metal.)
 The black tree is the symbol of Baran’s family.
Before you get too intimidated about even the idea of freehand, consider that chances are, you already have painted some. So don’t get too in your head about not being able to do it before you even try. Have you painted pupils on a figure’s eyes? You’ve painted freehand. An animal pattern like stripes or spots? Freehand. Camo? Freehand. Painted in a strap or other detail that was sculpted on the original but the outline isn’t well defined on the miniature cast that you have? That is freehand, too.
Now at the same time, there’s no question that painting freehand images and patterns can be challenging to do. It requires a decent level of brush control. (And a good brush to use that control with!) In fact, practicing freehand is a great way to improve your brush control. It also requires a certain amount of patience. There are likely to be moments of tension and frustration, and with large scale freehand projects, also tedium.
 This took some patience, and a whole lot of time. Also note these are 75mm figures.
A note to those who know that I also do 2D drawing and painting The two figures with freehand dragons and the two scenes that include painted text were all painted prior to when I started to study traditional art as an adult. I had taken art class in high school, but that was many years before I started painting miniatures.
Practice Before Painting
Practice and preparation greatly improve your chances for successfully painting freehand. However, I have at times also found practice to be discouraging, so I think it might be worth sharing some tips for how to practice in ways that will give you the most benefit.
Pencil/Pen on Paper Practice
In my early days as a painter, when I started to practice to work up to painting freehand, I began with pencil on paper. While there is some value to that, my experience was that it can also lead you astray or be discouraging.
Painting freehand on a miniature involves using a brush to apply liquid paint to a non-absorbent surface. This is a completely different set of tools from using dry pencil or pen on paper. Drawing on paper is of no benefit in learning how paint acts, nor in developing muscle memory to use paint on a brush. Note that painting directly on paper is also not the same experience as painting on a miniature, since paint behaves differently on the absorbent paper than on the non-absorbent surface of a primed/painted miniature.
Another issue is that the kind of simple line art you’re likely to draw with pencil practice does not reflect what a fully rendered piece of painted freehand can look like. Line art is flat, with no shading or highlighting. It’s very easy to start with some simple drawing practice and get discouraged before you even try painting freehand because your practice drawing looks flat and boring and crappy and not at all like what was in your imagination, so clearly you just aren’t ready to paint freehand yet.
Freehand that incorporates different colours and/or shading and highlighting to match the shapes of where it is applied on the figure is going to look different than simple pencil lines on paper. Don’t give up on the idea of even trying before you get past this point!
Even with paint instead of pencil, a tiny freehand design can look a lot different on a flat background with no context than it might on a miniature in the context of the pose of the figure and the various colours used to paint it. The Asian style dragons I painted below don’t look like much. Even the most finished looking of them, the topmost above the 3, is nothing too great.

Below is a photo of what the dragon I painted on the figure looked like. The difference in the practice and final dragons isn’t that I suddenly improved in skill in the minutes between painting the practice dragon and painting the dragon on the actual figure. The difference is that you’re seeing the dragon in the context of the overall figure and with the intended colour background. (And of course I put a lot more effort into painting precisely and fixing errors with the dragon on the actual figure.)
 This is an older photo taken with an older camera. I painted this in 2006. It was one of the first figures I ever sold!
That’s not to say that practicing with a pen/pencil on paper has no value, just that you need to understand that what you draw will not look the same as fully rendered freehand you see on a figure.
The big value of practicing on paper is that you can work out how to simplify your image/pattern. It will be easier to paint freehand if you first figure out how to break it down into basic shapes to replicate it. If you’re modifying an image/pattern to fit a particular size and/or shape of space, it’s also a quicker way to iterate options than using paint would be.
Consider the following as an example. The pencil practice on the left was on an index card, and definitely not at scale. I had started by looking at some dragon tattoo designs for reference. You can see how rough the initial drawings were, and how they look completely different from the painted version. I needed to work out the basic shapes I could use and how to connect them, and quick pencil sketches were great for that. The bottom right dragon is very similar to what I painted on the figure. It’s made up mostly of lines rather than having a snake-like body like in the initial attempts. I tweaked the final pencil version a little further to apply to the unusual shape of this miniature’s shield. (More on painting this shield below.)

Paint on Paint (or Plastic) Practice
The best way to become more comfortable and skilled with the tools you will use to apply freehand to a miniature is to practice with those tools – use a brush to apply paint to a painted or non-absorbent surface. You have a few options here.
Practice Miniature
Practice painting on something with surfaces similar to the area where you will be applying the freehand is ideal. So another figure with a flowing cloak if you’re trying to paint a line of trim on the edge of a flowing cloak.
 Practicing on a similarly sculpted area was very helpful.
Practice Before Painting
You can also use your actual miniature for practice. Before you start painting the area you plan to add freehand to, do a little bit of practice by painting your intended freehand design in the appropriate area to get a feel for it. This will help you see if your design is too complex or not quite the right shape, or if the area is too small for your current level of brush control. Make sure you use slightly thinned paint so you don’t build up any texture on the surface.
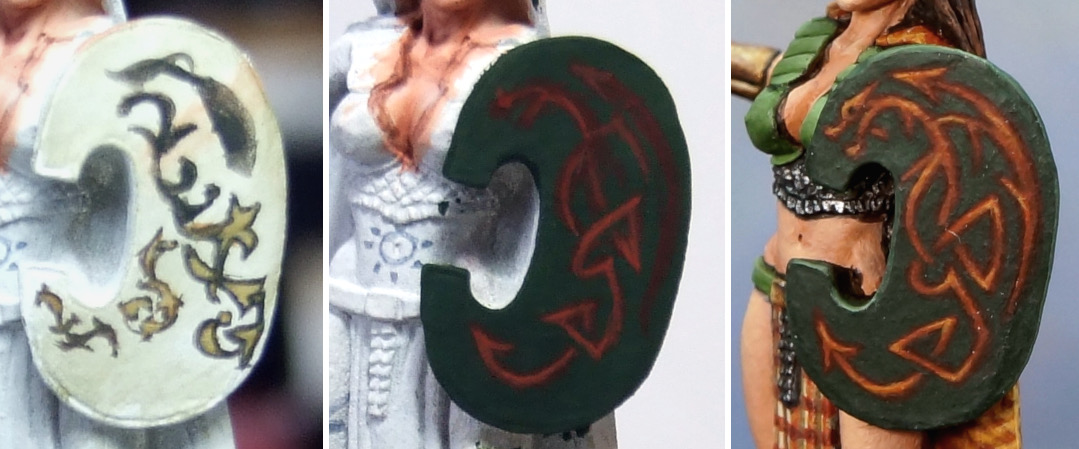
 In this case I had an extra copy of this figure from teaching a skin painting class. I tested some initial ideas, and then once I decided on the dragon design painted a practice run. This also let me test the paint colours I proposed to use. Looks like I was playing around with some ideas for tattoo freehand, as well. In the final version on the figure I added more shading and highlighting to both the shield and the dragon symbol.
Paint on Plastic
Plastic practice surfaces can work well, as plastic is non-absorbent. I often use black miniature bases or the bottoms of Bones miniatures for a little quick freehand practice. Plastic like blister packs and washed sour cream container lids is also a good practice surface, though you may need to add a coat of paint or primer to some plastics for them to take in the same way a painted miniature does.
Paint on Painted Paper
You can prime heavy weight paper like watercolour paper or index card. Or even just put a coat or two of paint on it and then practice over that. Cheap watercolour paper like Canson XL is great for purposes like swatches, colour tests, and freehand practice. You should be able to find it in big box craft stores. In general heavier weight paper will work better, but I’ve practiced on paint swatches on printer paper and index cards. Other than a good brush, you don’t need fancy or special tools to practice!
 I first painted swatches on printer paper to test the colour scheme. Later I used a brush and paint on that to practice freehand for the piece.
 Lucky for me the freehand in this case was supposed to look like it was drawn by a kid. :->
On versus Off Miniature Practice
Whichever practice surface you use, if it is not the actual miniature, you will have to work to keep in mind the size and shape of the area. It’s super easy to think you’re working at a size that fits the miniature, only to discover that you’ve been practicing at a much larger size than the area on the figure.
It can be helpful to actually measure/trace the area on your figure and copy that onto your practice surface. The tick marks on the practice sheet for the tiny dragon above are 5mm apart so I could keep the size of the area on her shawl in mind. The black stripes in the following image are the size of the street sign I wanted to paint.

Most practice surface options are flat, which may not be true of the area of the miniature you plan to paint on, so that’s something else to keep in mind. If you’re newer to painting freehand I recommend painting freehand on flatter or gently rounded surfaces at first.
Step by Step Freehand on Baran Blacktree
Now let’s look at a step by step example of me painting a simple freehand image on the shield of Baran Blacktree.
In reality I did not do a ton of advance practice prior to painting the shield images, but keep a few things in mind before you judge me for not practicing what I preach. At the time I painted this I had painted all of the above figures and several more with freehand and precision detail painting. I had also been studying traditional art for a few years, so was practicing in other ways. And most importantly, I was on a tight deadline and willing to roll the dice a little. ;->
Step One
In the photograph below you can see my practice surface and the shield prior to any freehand. My practice surface was the bottom of a Bones miniature. I practiced making the basic shapes, and worked out the steps I would use to apply those shapes to the miniature. The black border section was drawn with Sharpie, based on measurements of the smaller area on the shield, to ensure I did a practice run at the same size area as I would be working on the figure.
The silhouette tree design was inspired by some clipart tree drawings. Silhouette style art can be tricky in that it does not have shading and highlighting applied, or any other colours. Part of why I practiced was to feel confident that the basic shape of the tree I had designed was clear and interesting enough to work well as a silhouette.

Step Two
I used poster tack to attach my practice figure to the painting handle holding Baran. This kept it very close by so I could easily reference it while painting. In this step I have laid in the initial tree shape. I did not use super thin black paint for this step. I used slightly thinned light grey paint. It can take a lot of coats of paint to cover over mistakes or bits you’re not happy with on a light colour like white. I wanted to make sure I was happy with the basic overall shape before applying true black paint. Slightly thinned rather than super watery paint was easier for me to work with. Though if you find you feel like the paint is a little ‘sticky’ and doesn’t feel like it’s coming smoothly off the brush, add a bit of Flow Improver to it. (Learn more about paint additives and mediums in my upcoming free class!)

Step Three
Next I painted in the initial shape on the second tree. It was more efficient to work on similar stages for both images at the same time instead of painting one to completion and then painting the second. It also helped me keep them in sync and as similar as possible. However, the shield areas are slightly different shapes and sizes. And I’m human. So I could not exactly duplicate the tree. The medieval crafter who would have applied something like this in real life would have been in the same situation, so I didn’t stress that too much.

Step Four
I started to build up the flat black colour on the trees. I did this in multiple slightly thinned coats. Again, better to go slowly and carefully than have to spend a lot of time and effort fixing mistakes.
The effect in the WIP picture below is a little like shading and highlighting with some depth and variation in the trees, so this also gives you an idea of how something painted with a little variation of colour/shading can look different than a flat shape or simple line art.

Step Five
Once I was happy with the shapes painted with the lighter grey paint, I painted several coats of slightly thinned black paint over each tree shape to build up the black silhouette appearance.

Patron Spotlight: Lana Tessler
This blog is made possible thanks to the generous support of my patrons. The Patron Spotlight is an opportunity for me to share their work and philosophy with the world!
Lana sent me her photos just as I was putting the finishing touches on this post. By sheer coincidence her figures include some fantastic examples of painting freehand, so they’re very topical to the post! The rest of her painting is terrific, too! You can check out more of Lana’s work on her Instagram page.
In Lana’s words:
I am largely a hobby painter but always working to improve. I’ve been mini painting for about two years but I have over twenty years of 2D art experience and love applying that to miniature painting.


Figures in this Post
Baran Blacktree is available in metal. Coming soon(ish) in Bones plastic.
I do not know who manufactured the Dancing Couple or if they are still available.
The metal version of Misaki from Wyrd Games is no longer in production. There is a different plastic sculpt available.
The Female Warrior with Sword is available in metal from Dark Sword Miniatures.
Masquerade Ball Sophie is available in metal.
Little Miss Pigtails and her dragon friend Smokey are no longer in production. Nor is the table item. The open book and the closed book are available in metal.
Bourbon Street Sophie is available in metal.
The Frost Giant Queen is available in Bones plastic.
Father Christmas is a seasonally available Reaper figure.
Doctor Oronotius and his owl companion are available in metal.
The Christmas Hugs dragon is available seasonally from Reaper.
Kelainen Darkmantle is available in Bones plastic and in metal.
