Ko-fi tips help keep this content free. Patreon supporters receive PDFs with high res photos.
Recently Reaper Miniatures sent me samples of one of the base texture inserts in their Base Boss 2 Kickstarter, and I took it as an opportunity to explore the variety it is possible to achieve with painting base textures and simple base construction/conversion. I used only paint and a few simple materials to create the different types of landscapes pictured below.

I converted and painted most of these bases on my Beyond the Kit stream show, so you can watch video one or video two if you’d like more in-depth information about how I converted and painted the bases.
I customized one of the bases by cutting a piece out of another and gluing it on top of a section to create some variation in the height of the base parts. I used pumice paste to blend the seam where the edges met into the rest of the base. The same material is very handy to use on bases constructed from layers of cork. If you have some rough spots on a base you sculpted, it works well to hide those, or add a bit of dirt and texture on top of something like a cobblestone or pavement texture.

For the unpainted base to the above right, I also used some modeling/moulding paste. This has the same kind of thick consistency as the sandy texture/pumice paste, but it’s smooth. It’s a great material to fill small assembly gaps in miniatures, like the gap you often have when you glue a miniature’s feet to a base. You can’t truly sculpt either of these materials, but you can shape them a little with a toothpick and smooth them out with a damp brush. The modeling paste is the white substance on the left of the base, and the pumice paste is the beige one on the right. I demonstrate these and several other basing products in my Additives, Mediums, and Texture Pastes video.
 You don’t need to look for these specific products only! Most larger artist acrylic paint lines include various kinds of texture pastes that are similar. (The product on the left is by Vallejo. I think they have changed their packaging and some of the options for their base texture pastes since I purchased this jar, but they still sell something similar to this.)
I customized a few of the bases with other basing construction products that are useful to have in your arsenal. You can make your own natural texture bases with products like fine gravel/sand and rocks. Combine them with the pastes above for even more variety! You can find the gravel mixtures sold by some miniature accessories companies. You’ll find an even bigger selection if you explore the offerings from model train supply vendors, like Woodland Scenics. These are often sold in much larger quantities than miniature painters need unless you’re making terrain boards. If you have local friends, you could go in as a group to buy a variety of items you split up amongst the group. For small rocks and shells, also look at hobby products in stores like Michaels and Joann.
 The small rocks are from the flower arranging section of a hobby store. The rock and sand mix on the left was purchased as a miniatures product. The gravel mix on the right is a mixture of Woodland Scenic products.
Another way to enhance bases is by adding additional items on top. I used dried flowers on the two bases on the below left. I was aiming for the look of seaweed on the centre one. I used flowers and grass tufts on Finn Greenwell’s base for another example. I added a twig to the base on the below right to create the look of a fallen log. Sapling tree roots are another interesting option. Next time you’re out in the garden, pull a few up and dry them for basing. Dried tea leaves make a nice forest floor scatter. Herbal teas can contain even more interesting plant materials. Many of these natural products appear a little differently if primed and painted than when added to a base at the end, so I recommend experimenting to maximize your options.
 You can purchase tiny dried flowers like these most easily by looking for those sold to nail polish artists. Bring along a miniature to check scale if you want to shop the dried flower section of a hobby store. If you don’t want to bother looking for twigs and roots to dry out, Woodland Scenics sells stumps and deadfall, which is what I used on the base to the right.
Now let’s talk about what you can do just with paint! When I first looked at the base insert, it put me in mind of various types of possible landscapes – desert, swamp, flat areas of badlands, even the surface of the moon! I studied some pictures of various landscapes for ideas and colour possibilities. Referencing real life scenery can be very helpful to better base construction and painting!
 This swamp picture by Cole Freeman on Unsplash is an example of the kind of reference I looked at.
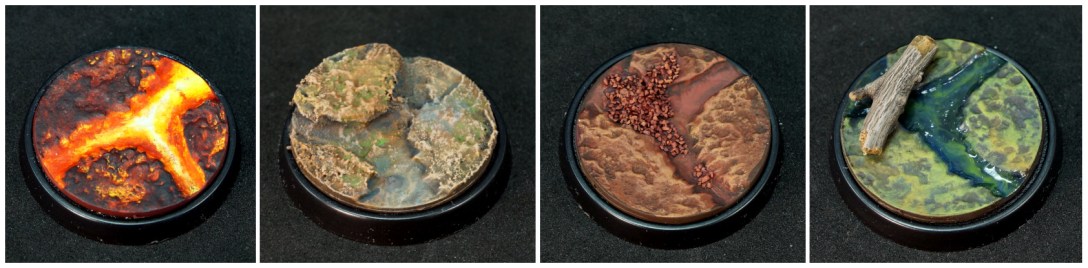
Soon after I received the base inserts I saw that some other painters had painted them as lava, so I gave that a try.
It was super easy and fun to paint. I just started with white, and moved up through yellow, orange, red, dark red, and dark brown. I used drybrushing on the raised texture areas of drying lava, and layering on the molten lava.

For several of the bases I primarily used the basic techniques of washes and drybrushing. I added some additional shading along some of the edges.
 Lunar surface, Martian surface, snow and ice.
On other bases, I used a lot of wet in wet painting. I used the properties of wet paint to get some of the swirls and whorls on the two swamp bases. First I applied a layer of undiluted paint fairly thickly. Then I heavily loaded a brush with a different value and/or hue of undiluted paint and gently touched it to the surface of the first layer of still-wet paint. I did this in a line along the water on the base with the log, and touched it to various points on the base with the flowers. I added a little drybrushing and extra shading as necessary to bring out details.
Traditional wetblending can also work well for painting many kinds of base textures. Textured surfaces like bases are ideal for wet blending experimentation and practice. The texture helps break up transition lines and oopses. If you’re frustrated with wetblending, grab some bases and give it a shot!
 I painted the log. It’s a good rule of thumb to paint just above everything on a base. You can even add washes and/or drybrush the tips of static and clump grass to help add detail and unify it with your paint job. I thickly painted two coats of gloss sealer over areas painted as water to add to the illusion of the texture.
I think the one below ended up being my favourite. Which is kind of funny, since when I first started painting it, I was not optimistic about how the paint job would end up. I had used a very dark wash, and it looked like a dark brown lump. I went back in and lightened it up, and used it as an example on stream of methods you can use to add some colour variation to bases. Even subtle colour variation can add a lot to a base. Using a single colour to paint a base, then another single colour to wash the whole base, and then the same colours to drybrush the entire surface of a base makes everything very uniform, which can end up kind of dull to look at.
One way to add colour variation is to use a few different colours to lay down your initial paint layer. You can drop a little wet into wet like I did on the swamp bases, or paint patches of different colours next to each other and use the tip of your paint brush to blend the edges of them a little while the paint is still wet. Don’t be too worried if it looks kind of patchy at this stage. Use a wash of a darker values of one of your colours, and then drybrush up with lighter values of one of your colours. The wash and drybrushing help unify everything as well as bringing out the textures, but touches of the original colours peek through and add variation. Another way to add variation is by adding touches of another colour in a few places with a glaze/wash, or drybrushing/scrubbing in another colour in a few spots with slightly thinned paint. I think I used pretty much all of these techniques on this base, and you can see me put them to use in the video. (Go to minute 44:20.)
 I started with an even darker version of the base on the left, and ended up with the base on the right. This base also ended up being a reminder to me of the necessity to persevere through an ugly phase and being willing to work on something and experiment to try to improve it!
If you’re interested in more information about the base inserts, they’re part of the Base Boss 2 Kickstarter that is ending soon. The focus of the Kickstarter is to fill in missing sizes of Reaper’s black plastic base offerings, but they are also testing the waters for interest in pre-sculpted base textures. I love pre-sculpted bases! They are a great option if you’re pressed for time, don’t have a lot of sculpting/base construction materials, or want a simple way to base a number of figures in a uniform texture. The bases I used on Baran Blacktree and Caerindra are resin texture bases I bought years ago.
The base topper textures in the Kickstarter include Lowlands/Lava, Sci-Fi, Skull, and Wood Plank. You can also see the cool ways several other painters painted the same insert I worked on the Kickstarter page. The base we received is number 75101 on the Lowlands chart.
The Reaper texture bases are two part. One part is an insert that is designed to fit into a lipped black plastic base, as you can see in the photo below.

This is handy for a couple of reasons. One is that you can do all the messy stuff with the insert, and then just glue it into a clean black base that you don’t need to paint. In playing with the bases I was sent, I discovered that because the topper is thinner than an all-in-one base, it’s easy to cut it up to customize it. I used clippers and a hobby knife to cut up and shave the bases.
 In the photo above, I cut a section out from one of the base toppers and glued it on top of another one to add additional height to a section. Then I used the pumice texture paste to blend the join, as I shown in a picture near the beginning of the article.
