The Patreon supporter PDF version of this article includes additional photographs. Ko-fi tips are another way to help keep this content freely available to everyone.
In a previous post I discussed the preparation and planning that went into painting Reaper’s promotional dungeon delving adventurer party, and I shared pictures of the group. In this post I want to share my process for painting the halfling fighter figure, as well as the colours I used to paint him. Over the next few weeks I will share articles for each of the characters in the party, and finish up with a look at some of the factors that go into painting source lighting effects. Articles for the human rogue, dwarf cleric, and elf wizard are also available.


Halfling Fighter Process
After I was warmed up painting the rogue, I decided it would be best to tackle the figure that seemed most daunting to me: the halfling fighter. The challenge with this figure is that, when they are positioned as a group, the only in-scene source light falling on the fighter is located on the back and to one side. If I used a wide value range between the shadows and highlights in his unlit areas, it would undercut the impact of the lighting effect when the figures are posed together. But if I used a low value range between shadows and highlights in the unlit areas, he would not be very interesting to look at when viewed as a single figure.

In the planning stage, I had already decided that the figures needed to look interesting when viewed individually, so I knew I needed to sacrifice how powerfully I could portray the lighting effect. I decided to begin by painting him as if lit by a fairly high level of ambient light, but with lower contrast than I would normally use. Then I would review the effect when the figure was closer to finished to see whether it looked dynamic enough, or if I needed to bump the contrast up further.
Note that we as painters make decisions like this all the time. That’s true of all levels of painters, and for all types of painting – tabletop, display, unit, etc. Often these decisions are unconscious, or made on the fly without stopping to check in with our current general painting goals or our specific ideas for our current project. Regardless of your skill level or the amount of time you want to put into the figure, this can lead to making conflicting decisions that dilute the impact of your final paint job.
For example, in the case of these figures, imagine I had instead decided that the lighting effect was the priority. I would have needed to paint the fighter as heavily shadowed, with a lot less contrast and less detail, even in areas that I am used to painting with more contrast and a lot of detail, like the face. That need for the fighter to be in shadow may be more obvious when viewing them as a group, but I had to paint them individually on separate holders. While painting each one, I would spend a lot of time looking at just that one figure, and it would be really easy for my subconscious painting habits to push me to add more and more contrast while I was painting. After all, we are very used to trying to push our contrast! A dark and shadowy figure with less contrast would be what my scene needed, but would be very different from what I’m used to looking at while I paint, so if I went into autopilot too much, my brain would push me to add more colour and contrast to make what I was working on look more like what I usually paint.
Pushing contrast is probably the example that most of us are familiar with, albeit in the opposite direction. For many of us, it goes like this. You start painting a figure with the intention of pushing your contrast, but if you don’t keep your focus firmly on that goal, all the little micro decisions you make subconsciously while painting will mean you end up with a figure that looks pretty similar to what you usually paint. You need to keep your mind on your end goal so you can push past the points where what you’re painting feels uncomfortable because it looks different than how you usually paint (which is what you want if you’re trying to learn or improve) or when the middle part of the process doesn’t look so great. (The legendary ‘ass phase’ of a paint job.)

It is very helpful to do some planning before you begin to paint – work out your light direction, some ideas for the colour scheme, your level of contrast, etc. But regardless of the amount of planning you do before you start, you will only get the full value of your plan if you stop now and then during the painting process and remind yourself of the goals and decisions you made for this project, and assess whether you’re painting in the way you intended. This is particularly necessary if you are trying to paint an effect, method, or colour that you don’t usually use.
I didn’t really have a vision for the colour scheme of the fighter when I began, so I started thinking about what colours to use by process of elimination. I knew I wanted to use blues on the wizard, and I already had teal, tan, and reddish-brown on the rogue. I settled on green for the fighter’s clothing. It felt in keeping for the character of a halfling. The logical choice for the leather parts would be reddish browns, since red is the colour complement of green. I didn’t want to have much red on this figure since it was not heavily lit by the warm light of the torch. Yellow tan and orangey leather colours seemed like alternatives that would still complement the green both in terms of colour harmony and the pastoral vibe for the halfling.
I attempted to paint the halfling with a somewhat darker skin tone in order to add a bit more variety to the party. Unfortunately I don’t think I managed to pull this off. I think this was because of the constraint of using contrast values to evoke lighting more than form. (Emphasizing form aka 3D shapes is why we need to use contrast between shadows and highlights.) I am sure there is a way to pull off both of those things, but I did not find it this time. In retrospect it probably would have been more feasible to paint the rogue with a dark skin tone, because that figure has lots of in-scene lighting on it.

When I decided to start painting some of the non metallic metal on the figures along the way rather than saving it all for the end, I started with the fighter. My perception of a figure can change a lot once the bulk of it is painted, especially once the little accents of metal objects like buckles and such are painted. I thought that if I filled in the NMM on the fighter, I would be able to get a better idea of whether the value contrast was too low.
I reassessed the areas of NMM I initially painted later on, and decided I needed to increase the value range of the contrast on the NMM. I planned to glaze in some colour from the light sources, shadows, and reflections. Even a very thin glaze has the effect of reducing the contrast range. If you paint glazes of lighter colours over dark shadow areas to introduce some colour into the shadows, those areas shift slightly lighter in value. If you paint glazes over the lightest parts of the NMM to create the illusion of reflected light, that darkens those areas. So I needed to try to over exaggerate things in these initial stages to have them look right at the end (hopefully). You’ll often find a similar consideration is necessary when you use a lot of weathering, which can likewise reduce contrast.
Halfling Fighter WIP Photos
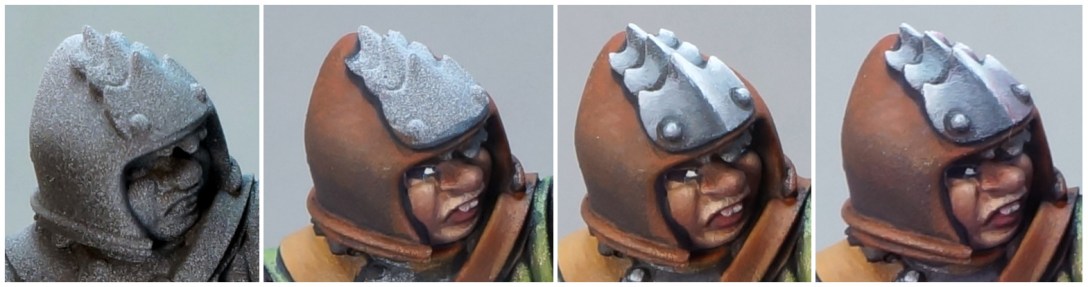
I explained how I used primer to create a roadmap for the lighting in the overall process post. I took photos of the primed figures individually and as a group so I could use them as a lighting reference if I painted over an area but then later needed to check my lighting placement. I took pictures from numerous angles, I’m just showing a few of them here. When it comes to reference photos, it’s better to take too many than too few!

This priming technique provides an excellent overall feeling for the location of light and shadow. However, it does not take into account the way different textures and materials appear, and how they react to light – matte cloth versus somewhat shiny leather versus reflective metal. To best evoke the qualities of those materials requires the painter to use the primer (or lighting reference photos) as a guide, but to then extrapolate and tweak value ranges and value placement to match various types of materials. For example, if you compare the areas I painted as metal on the figures to the photos of the primer stage, you’ll see a number of differences in where the lightest and darkest colours are placed because I was trying to simulate the reflective appearance of metal.


Halfling Fighter Paint Colours
There are a few colours, like the non-metallic metals, that were used over all of the figures. You’ll find information about them in the overall painting process article.
The swatches below show the layer mixes used on the skin (top) and clothing (bottom) of the halfling fighter.

Fighter skin colours:

Fighter clothing colours:

Fighter tan leather accessory colours:

Fighter orange leather armour and backpack colours:

Fighter belt pouch colours:

How to Get this Figure
The adventure party figures and a dungeon dwelling goblin are teasers for Reaper’s Bones 6 Kickstarter: Tales from the Green Griffin, which is happening right now! A random selection of one of the five figures is still being added to most Reaper Miniatures orders. One of the five was included in the swag bags for AdeptiCon, and there may be other giveaway opportunities where you can obtain one or more of these figures. If you are interested in these figures but are not able to receive a free one, or you’d like to ensure you get all of them, they are included in the Kickstarter core pledge level. I expect that they will go into retail sales channels at some point after the Kickstarter pledges have been fulfilled, but it will be several years until that happens.
