In this article I’m going to talk about the sculpting and painting inspirations for this figure, and how you could help the Ukraine by buying a copy of your own to paint.

I’ll start with the links for those who just want to jump straight to the Ukraine relief, and then get into the paint process, the colours I used, and the story behind this figure. Head to Reaper’s page if you want to buy your own copy of Kobzar Soloveiko the nightingale bard. For a limited time, Reaper is donating $7.50 of each sale to UNICEF relief efforts for children in the Ukraine.
 You could win all this stuff and an hour of video consultation with me.
When Reaper wanted to produce a figure to raise funds for the Ukraine, sculptor Jason Wiebe came up with the idea for Kobzar Soloveiko, the nightingale bard. Jason describes his inspiration for the figure:
When we first discussed a Ukraine relief project, the word Kobzar came immediately to mind. Historically, a bard known for pointed opinions, and colloquially is used for various eastern European street musicians. A bard seemed a good choice, but what kind of bard?
The European Nightingale is taken by some as a national bird of Ukraine, Soloveyka along with other common spellings. We settled on Soloveiko for the ease and western phonetic shorthand. A nightingale is a rather unassuming bird with a legendary song.
Sunflowers are somewhat of a more recent symbol, due to their economic status in Ukraine. Now it all came together, as if it had to be; a small but proud character, singing its song with strength and love. I am happy to present the Nightingale Bard, Kobzar Soloveiko!

When the figure released, I bought several copies to support the cause. And because it’s the kind of fun character I love to paint!

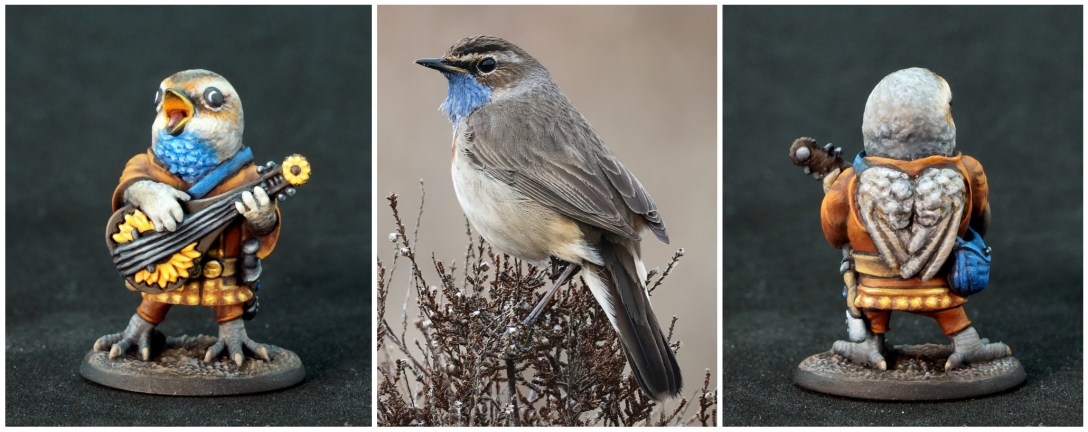
He looked so fun to paint that I decided to start on him right away, on my Reaper stream, Beyond the Kit. My paints are not stored near the desk where I paint (and stream), so I needed to have some ideas for colours I wanted to use in advance. I started by looking for pictures of the nightingale found in the Ukrainian region. I expected to find a dull bird that wouldn’t help much with my colour choices, but I was pleasantly surprised to find a bird with some interesting colouration. If you do an image search on the term ‘bluethroat’, you should find some great pictures. The bird in the picture below isn’t as vividly coloured as some of the images I saw on a general search, but it is the one I could find that I am permitted to use publicly.
 Photo by Hans Veth on Unsplash.
The appearance of the nightingale gave me some good ideas for colours, but I thought it would be a good idea to explore the possibilities for various ways to use those colours, the way I did when I painted Fathom, my character from our artist D&D game. I ended up liking the first version I tested enough that I didn’t really keep on with the testing, and decided to just go with the first idea. It’s not visible in the photo above, but the real nightingale has a rusty orange stripe on its chest beneath the blue throat, so I decided to use the orange for the clothing of this anthropomorphic version.
 Read the Fathom article for tips on how to do this kind of digital colour test with your own figures.
I painted the bulk of the figure on stream. The videos are now posted on YouTube, so you can see exactly how I did the painting if you’re interested. I painted the feathers and his jerkin on the first video. I did darklining and painted the leather areas during a second video. The rest of the figure was painted and revised off-stream. Many regular viewers of Beyond the Kit prefer a variety of content topics rather than seeing me paint a figure from start to finish, so it is rare for me to do that. Anne Foerster’s RTB stream on the Reaper channel is a great place to watch the full painting process for a number of figures. I painted the lute, feet, and some of the other details off stream. Since I was donating the figure, I later spent some time making small improvements to the painting overall. I also revised the patterning on the head to better match the reference photo of the bird I was using.
 A work in progress picture following my first painting stream.
When I was finished the second stream, I thought the painting was going well enough that I wanted to see if I could figure out a way to raise more money for charity with the painted figure. When I heard that NOVA Charities was planning a raffle for the Ukraine, I donated this painted figure to the raffle. Jason Wiebe donated a signed blister of the unpainted figure and Reaper donated one of each paint I used to paint him. That raffle has now concluded, but NOVA Charities regularly runs raffles where you can win fantastically painted figures from miniature painters all over the world.
 A work in progress picture taken after my first video stream.
Some Notes on Miniature Photography
I thought it might be interesting to compare the differences in some of the photos I got with different cameras and different lighting setups. If you find this interesting, let me know and I’ll try to include more information like this in future articles.

The photo on the left was taken with my cellphone under my painting lights. I placed a sheet of grey drawing paper behind the figure to help the camera focus. I also held the figure in my hand and tilted it figure until it had the best lighting possible on the front. If I sit a figure down on my desk and try to take a head on photo, it will look a lot shadowed and darker than this, like the pictures with paint bottles below. If you can’t move the light to the figure, move the figure to the light. I then edited the photo to crop away boring stuff on the sides, but I also did use the magic wand option in the editor on my phone. My cellphone is an iPhone 12 Pro (currently one generation behind.)
The pictures on the centre and right were both taken with my ‘good’ camera in a well-lit setting. For the blue background photo, I manually adjusted the levels of grey and white by using a grayscale reference card that I put include in frame with the figure to take the photo, and then crop out later. I occasionally adjust the brightness of a photo up or down if that seems out of whack, but that’s about all the editing I do on my miniature photos. The photo on the right was taken with the same camera and same lighting setup, but with a black background. I also have to alter the exposure compensation on my camera depending on whether it’s a lighter background or the black background. I haven’t had great luck manually editing levels with photos on black backgrounds, so I just choose the auto levels for those. To me there’s always a notable difference in colours between the photos taken on the lighter vs the black backgrounds. Figures really pop on the black background, but I think the photos with the lighter backgrounds have more accurate and nuanced colour.
The ‘good’ camera I use was specifically purchased to take photos of miniatures, though it does take pretty nice pictures of other things when I bother to drag it out for that purpose! It’s one of the first few generations of mirrorless cameras, a Sony Alpha NEX-F3, which released in early 2012. I bought it because it combines many of the full DSLR features that are useful for taking pictures of miniatures, but also has plenty of auto settings for non-miniature photography. I am very much not a photographer and I also can’t afford a full DSLR and good lenses and so on. Mirrorless cameras have larger sensors than standard digital cameras, though smaller than a full DSLR, and that makes a lot more difference than super huge megapixel picture sizes. Sure I’d love a newer camera, but this one continues to produce photos that clients like Reaper are willing to use for print quality, so I don’t feel like I have to have a new one. If you’re looking to buy a camera to improve photos of your miniatures, I recommend looking at older but higher quality cameras you can usually purchase for a similar price to a new mid-range camera. I have found the site Digital Photography Review to be invaluable for researching the last few cameras I’ve bought, and their detailed reviews include photo examples of stuff similar to what we do. (Coins, figurines, and objects with detailed text in huge closeup photos.)
The main thing I recommend to someone frustrated with photos of their miniatures is to play around with lighting and backgrounds before assuming the problem is your camera. There’s no one answer for this. Some cameras like loads of light, some phone cam software brightens stuff up so much you might need less lighting to get a better picture. As a general rule keep the lights brighter and further away from the figure, or diffused, if you want to avoid glare. Use a background. It looks nicer to the viewer than a clutter of paint and brushes. It also helps your camera know what to focus on. Pure white and pure black backgrounds are challenging to photograph against. The ideal is a mid to light blue or grey matte surface. Grey toned drawing paper is what I used in the cellphone pic above, and what I use for my streaming camera background. I use Strathmore, but I’m sure there are similar grey paper options available from a variety of sources. The mottled blue background sheet I use is no longer available. For plain colours like the black background, I like to use sheets of fun foam. It’s very matte, soft and safe for figures, and makes a nice sweep, though on the downside it gets marked up pretty easily. I’ve bought my sheets from local craft stores, but this item on Amazon seems similar. I have found grey the hardest colour to find weirdly! (The links in this paragraph are Amazon affliate links. Purchasing through those links helps support this site at no additional cost to you.)
Paint Colours Used on Kobzar Soloveiko
I am rarely able to keep track of the colours I’m using in the way I usually do when I am video streaming. I used a lot of wet blending on Kobzar’s head, and that is also much less systematic to outline the colours for than when I use layering. The colours listed below are the ones I recall to my best ability, but I do not consider these colour recipes to be as precise as what I often list in these articles.
Head, Hands, and Wings

Blue Throat, Blue Leather Bag

Orange-Brown Jerkin
I later used a bit of more saturated orange to punch up the highlights a little more.

Beak

Mouth and Tongue

Wood areas of Lute
The paint that is cut off on the left is Blue Liner, SKU 9066.

Gold Trim and Buckles

Sunflowers

