The Patreon supporter PDF version of this article includes high res photographs and better formatting. Ko-fi tips are another way to help keep this content freely available to everyone.
A lot of us want feedback on our miniatures to learn how we can improve. However, when we do get some advice, we can find it difficult to visualize what the figure would look like if we implemented it. This is one of a series of before and after articles I’ve worked on to help you see critique put into practice, and explain the principles behind common critique suggestions. You can also watch a first and then second video of the initial painting, and then a third video with a critique of the first figure and repainting the improved version.
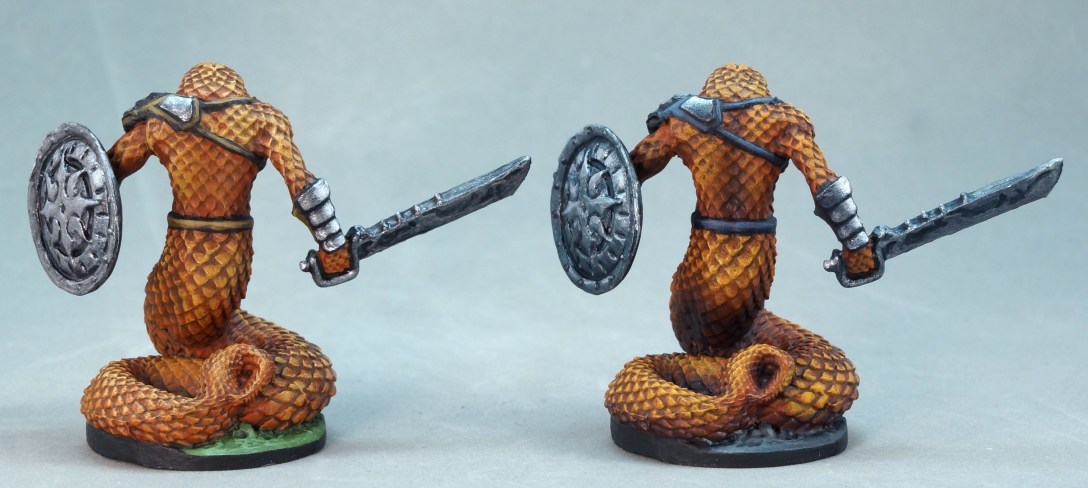
 Sculpted by Chris Lewis.
The differences between this before and after example may not seem super obvious with a quick glance at the photos, but I will explain how they illustrate some important concepts that can help you improve your quick tabletop painting as much as your time-consuming display painting. I have tried to make this a more incremental, rather than an extreme revision. Comparing a novice or even intermediate painter’s figure to an amazing award-winning one is not always that helpful – there are so many differences that it can be hard to break them down and pick out a few things to focus on in your own painting practice.
The reason it may be hard to spot the differences here is that I used the similar techniques on both of the figures, but I applied the paint to each using different principles. So the blending isn’t better on the after, it doesn’t have fancy freehand, and both are painted with metallic paints. Most of us focus a lot of attention on technique-related issues in our attempts to improve. How can we paint butter smooth blends, uniform lining, precise freehand, astonishingly realistic textures? Improving our range of techniques and our ability to deftly apply them are definitely steps on the ladder to improved results.
However, most of us put too much emphasis on technique. We focus all of our practice and conscious attention on improving our ability to handle a brush and manipulate paint. Smooth blending was my main focus during my first several years painting. One day I reached a point where I realized that my blending was not that much worse than the work of the painters I admired. But I still wasn’t winning awards and accolades at their level, and if I compared my figures to theirs, I could see that my paint jobs weren’t as interesting or visually striking. Was it actually not all about blending?? It is not! Painting great looking miniatures is not all about blending, or freehand, or textures, or non-metallic metal.
If you have ever worked to improve your technique, you already know that it is rare to experience a dramatic skill level-up between one miniature and the next. But over time, you start to apply the paint with more precision. Over time, you start to apply drybrushing or blending more skillfully. If you compare your first few figures to ones you’ve recently painted, the eyes and details are more neatly applied, the blending or drybrushing is less patchy. If you compare last week’s figure to this week’s figure, you won’t see a dramatic difference, but it and all the other figures you painted between then and now reflect increments of your current skill level.
The same thing happens with principles like contrast and colour use. Working to increase the level of contrast in your painting is usually something that occurs over a span of time because your eyes, mind, and hands are all involved in the process, and they don’t all progress at the same speed. Refining your use of colour is a similar process. You can memorize a lot of colour use information in a few hours, but figuring out how to successfully apply that knowledge to your figures takes a lot more time and hands-on practice. Your skill in using contrast, making optimal colour choices, and a lot of the other topics that might come up in a critique is going to be incremental, just like your progress with technical skills.
I think a lot of painters striving to improve their work have moments of frustration or confusion like I had when I realized that my blending was now good enough that it wasn’t the issue holding back my painting. My moment included the opportunity to make a direct comparison between a miniature I had painted, and Jen Haley’s version of the same sculpt. I could see that the smooth blending on my figure was actually pretty close in quality to hers, but Jen’s figure had much more nuance and visual interest. Part of what makes her miniatures look fantastic is her masterful technique, but the colour choices she makes and where she places those colours within the blending are also critical to her lovely results.
This comparison got the wheels of my mind turning about what else I might need to learn. Figuring out what I needed to study was not a simple process. (And is still ongoing!) I wasn’t able to consciously detect much what Jen Haley was doing differently in that first comparison. Once I did choose some subjects to work on, learning the concepts and successfully applying them to my painting was not a quick process. I had moments, even years, where I was stalled because I either didn’t know what to work on, or didn’t know how to work on it. Part of the reason I started this blog was to share what I’ve learned in the hope of sparing other painters some of the time and frustration I’ve experienced.
I designed this snakeman to be a more incremental example rather than a dramatic before and after. It’s not meant to be an example of the end goal. It’s an example of what the next few steps on the path might look like after a few weeks or a few months of trying to implement some colour theory and push your contrast a little. If you’re having trouble seeing much difference, study the photos closely, and read through the rest of the article. We rarely think of it, but looking at and assessing figures is part of the overall task of miniature painting. Training our eyes is as important as training our hands. Improving your visual discernment makes it easier to study other people’s work and figure out how they do what they do, and also helps improve our ability to assess our own work.
So let’s compare these snakemen to get an example of some of the concepts I’m talking about. In this article I’m going to talk about how your colour choices and figure choices can affect your end result. I’ll also share the kinds of critique comments you might receive on something like the before snakeman from a painting instructor or judge, and address some of the more minor points. The most important concept these figures illustrate is why the miniature community puts such an emphasis on shadow/highlight contrast. Explaining why that is so has grown into an article of its own that I will be posting soon!
![]()
Critique of the Original Snakeman
My goal for the before snakeman was to create an example of a competently painted figure – not totally novice, but also not amazing. I used washes and drybrushing for the scales and base, and basic layering on the equipment. I painted the figure on stream, and you can watch video one and video two if you’re interested in seeing the painting process.
Once the figure was completed I took a few pictures. I studied the figure in the hand, at arm’s length, and also studied the photos to develop the critique. The critique notes I made are below. I also talked through most of the critique points in a third video, while I painting a revised version of the figure to illustrate how you could implement some of the critique points. Note that this is a very thorough critique! I had plenty of time to study the figure, and I had painted it with the aim of trying to illustrate several issues to help people better understand critique comments they might receive. Because of the time it takes, you are unlikely to receive this detailed of a critique from most painting class instructors, contest judges, or those who share opinions online. This is more along the lines of what you might expect from a paid critique tier in a Patreon or something similar. However, within the critique are examples of some of the comments you might receive in a general critique scenario, and it is my hope that this article will help you better understand them.
 Overall:
* The colour choices work in terms of making the figure legible to the viewer, and being logical to the character/situation. None of the colours clash.
* The colour choices could work even better, however. The vivid orange could be contrasted with its complement, blue. Or as part of a triad scheme of orange-green-purple.
* There is an outer limit to how nicely I could paint the sword. If this were a contest figure, I would choose to paint a metal version if available.
* There are visible mould lines and glue joins that detract from the overall prep/presentation aspect.
Body Scales:
* The colour selection for the scales works well. The use of more saturated colours in the midtone and highlights adds some contrast and pop. The wash colour is more subdued, which helps the recesses appear to recede. It is dark enough to accent the scale texture without looking too stark.
* The wash brought out the texture of the individual scales, but it does not accent the overall cylindrical form of the snake body, nor the smaller forms of the muscles on the back and arms.. The highlights are concentrated on upper surfaces which does help create a little form, but shadow is more effective at making shapes look more three dimensional.
* Some of the highlights look a little fuzzy or messy in places. There is a big gulf between drybrushing scales and the long way of painting them, but it might be possible to tidy up a little.

Belly Scales:
* The belly scales look a little bland – there is not enough value contrast between the highlights and shadows.
* The belly scales are a fairly large proportion of the whole figure. They’re not just a little accent, so they deserve a little more attention than they received.
Metal Areas
* Detailing and highlighting of the metallic is solid.
* The wash accentuates the fine sculpted details on the metallic areas, but as with the scales, it does not bring out the forms. This is particularly noticeable on the larger spherical shield.
* The colour choices for the metals are pretty neutral – they don’t detract, but they also don’t add.
Base:
* Why green grass/vegetation on this base? Although this is a soft green, I feel like it draws too much viewer attention to an unimportant area of the figure.

Details:
* The eyes need to be painted.
* The painting on the straps is solid. It could be smoother, there could be edging and/or more contrast. As with the other colours it doesn’t detract, but it doesn’t contribute.
* The back of shield is just a flat colour, it could use some highlighting for dimension, and/or some detail like painted wood texture.
There are some small specific issues like the eyes, but there are also a several comments that relate to a few larger issues. One is contrast and form, and that’s the big topic for the followup article, but let’s run through the rest. I didn’t address every one of the critique points on the revised figure. I wanted to keep it in the same ballpark on a technique level, and to keep the focus on some of the non-technique concepts that we often overlook, but which are equally important to improving our painting level.
![]()
Make Colour Work for You
One of the larger concepts I wanted to illustrate with these figures is the idea of trying to use colour to your advantage. There isn’t really anything ‘wrong’ with the colour selection on the original snakeman. None of the colours clash or look improbable. The colour scheme doesn’t detract from the end result, but it also doesn’t enhance it. Colour is a potent tool we can use to inspire mood, evoke character, and create something that is visually pleasing. Good colour choices can create more visual impact for less time investment on armies and tabletop figures, and they can be crucial to improving the end result of display pieces that you put significant time and effort into.

I know it can feel like a waste of time to spend much time trying to figure out a colour scheme rather than just start applying paint to the figure. Maybe you’re excited to begin painting your big contest project, or maybe you’re just trying to get this miniature on the table ASAP. I jump in and just start painting all the time! And when I do, the results are rarely as good as on the figures where I take a little time to think about my colour choices before I start.
Detailed discussions of colour theory are beyond the scope of this article, but I do want to go over the considerations I made for this specific figure. These decisions were based on simple and widespread colour scheme suggestions that you would see on a colour wheel or online colour tools.
The colour selections for the original figure were:
* Orange scales with touches of muted red and yellow for the body, with more with subdued browns in the same colour family on the belly scales
* Steel armour with black shadows
* Tan leather equipment
* Muted green base
I looked at a couple of different options to decide how to make the colour scheme of the revised version more effective. I talk through this process on video. Orange is the dominant colour and I think the orange scales are the centrepiece of the paint job. Because there aren’t a ton of different areas on the figure, I probably need a colour scheme with only two or three colours.
One option would be an orange/purple/green triadic colour scheme. The figure already has green on the base. Note that the colours of a colour scheme do not all have to be obviously visible on the figure to work effectively. I would not have to add a vivid purple to the figure if I used the orange/green/purple triad. Rather, I could use dark purple instead of black to shade the metallics, and/or a purply brown for the equipment, something like Ashen Brown.

I did not choose this option. I don’t love the green on the base. Even though it’s a softer green, I feel like it steals some attention away from the main figure. This is not a vignette scene that needs grass/vegetation to tell its story. While I could sneak purple in through shadow colours, I don’t really see a way to incorporate more green into the rest of the figure other than painting it into the eyes, or repainting the equipment in a greenish colour. I wasn’t sure that using dark green wash on the metallics would look very natural, though I would have tested that if I had decided that the orange/green/purple triad was the way to go.
Another option would be to use a two colour scheme composed of orange and its colour complement. Complementary colours are those directly opposite from one another on the colour wheel. In traditional colour theory, the complement of orange is blue. This seemed like a better solution to me. Dark desaturated blue is great for shading metallics, and most other colours. Using a muted blue or grey-blue for the leather straps and armour would provide both colour and temperature contrast to the warmer scales, but still keep the equipment secondary in interest to the body. The textures on the base could be painted as grey stones with blueish shadows. A rocky environment fits as well or better with the character, and the more subdued colour keeps the focus on the figure itself. I used the same muted blues to paint additional shadows onto the snakeman’s body, which I will talk about in the article about contrast and form. Using a colour complement and/or a cooler colour in shadows usually works pretty well. (Purple would also have worked as well if had I chosen the triad colour option.)
The colour choices are not earth-shatteringly different between the two figures, but I do think that the revised figure with the complementary colour scheme comes together more and looks more pleasing to the eye than the original colour choices. Apart from adding additional shadows, I painted these colours with the same techniques as on the original figure. Colour choices that work together are just as effective for great tabletop figures as they are for display figures.
I know colour is a scary and confusing topic for a lot of people. However, keep in mind that you don’t have to learn and understand everything about colour before you have any hope of improving your colour use! You can start with a few simple principles, like using complementary colours together, or simple sets of colours like triadic colour schemes, or the idea of using cooler colours for shadows.
![]()
Figure Choice and Preparation – Best Foot Forward
Another larger concept I wanted to demonstrate with this figure is that the end result you can achieve with your piece is limited by the sculpt you choose, and the way you prepare and present that miniature. There are painters who can make anything look fantastic, and I’m sure there are people who could turn this or any other figure into a gold medal award winning entry. If we aren’t sure that we are one of the painters who can pull that off, it is to our advantage to put some thought into which figures we choose to spend a lot of time and effort on, and to prepare those miniatures to the high degree that we can.
The snakemen I painted are classic Bones plastic miniatures. Classic Bones is a somewhat soft plastic. Edges and detail aren’t always crisp, and thin straight parts don’t always look as straight as they should. Now, I think this is a great figure, and that’s why I chose it for a class on scales I taught a few years ago! The scales and the shield detail are crisp and paint up well. But there are some issues that would make me leery of choosing this as a competitive contest entry I intended to put a lot of time into.

Join Gaps
There is a visible gap where the body joins the end of the tail. (You can see it just below the shield in the photo above.) I could probably use filler to mostly fix this, but it might require using putty and some sculpting to create a completely seamless join. There is also a smaller gap where the head attaches to the body that isn’t noticeable on some copies of this figure, and is easy to fix with fillers on copies where the gap is a little looser.
Sword
The sword is one of those thinner pieces that are hard to make look completely straight in classic Bones. The sculpt includes runes etched into the sword blade, and those aren’t as crisp as the rest of the detail on the figure. It would be more challenging to paint this than a similar sword on a figure made of metal or hard plastic.
Mouldlines
As a general rule, higher level contest entries are expected to not have readily visible mouldlines. Cleaning mouldlines off of classic Bones can be challenging. Cleaning mouldlines off of scales can be challenging in any material. Together that is more challenge than I would want to deal with. If I could get a metal or resin copy of the figure, I could probably prep it cleanly, though it would take some time investment. (And there are metal versions of some of the Nagendra snake people.)
Scales
Some textures or techniques range across a spectrum from quick and dirty to flawlessly executed. For blending, you might have rough layers transitions on one end and silky smooth blends on the other, with a range of options in between depending on your expertise and how much time you want to invest. You can paint an effect like source lighting across a similar spectrum, from drybrushing through to flawlessly blended. I think there are other techniques or surfaces that are extremes rather than a full spectrum range. Feathers and scales fall into that category for me. You can do quick drybrush/wash scales, slightly nicer side brush scales, or all out I am taking hours to paint all of this the hard way scales. There’s aren’t a lot of in the middle options for scales. If you don’t have the dexterity or the time to paint scales the hard way, you may have no choice than to paint them at a lower level of ability than you could demonstrate if you were painting another kind of surface texture. It is to your advantage to select miniatures that are primarily made up of elements that allow you to showcase your strengths.
Base
The base of this snakeman is pretty simple and very small in area. It doesn’t offer a lot of opportunity to demonstrate the ability to paint other materials/textures, or even space to build up more of an environment with flock or grass and so on. Extending the base of the figure would enhance it. Fitting the base of the figure onto a base with a bevel or rounded edge would also add a little polish to the presentation of this figure, like putting a painting in a frame.
If you’re new to contests and confused by some of the terminology here, check out the contest and show overview article.
MSP OPEN NOTES:
Classic Bones figures are welcome at the MSP Open! There is even a special Giant Sized Monster Award for the Reaper monster entries, and almost all of the figures that would be eligible for that award are produced in the classic Bones material. We understand the limitations of the material and would not count something like a slightly bent sword or spear against you. Entries submitted to the Painters category are not expected to have elaborate, or even any basing. A figure/bust on a plain black base or plinth is a complete entry for Painters. Painting considerations alone make up 70% of the score for a Painters entry. Note that this does including the painting of any base elements that are present. (And earth and stones and such on a base should be painted.) The other 30% includes factors like workmanship, creativity, difficulty, and presentation. Thus it is possible for poor base construction or painting on a base to detract from a Painters category score, and for imaginative, well-constructed and well-painted basing to contribute to it. More information on MSP judging considerations and FAQs is available.
 The awards at the MSP Open include open medals, and podium award manufacturer trophies.
Contests and Shows in General
Podium style contests where judges/votes select a first, second, and third place in each category are very competitive. Depending on the size of the contest, the judges may begin with five or 15 or 35 entries that all look potentially eligible for a top three spot in a category. This group is known as the first cut, and it’s an honour to make it there! It sounds harsh to say it, but in a podium style contest, the judges have to find reasons to eliminate entries from consideration until the number of pieces remaining equals the number of awards available. If two pieces are roughly equal in quality on first assessment, the judges look for reasons to keep or eliminate one of them. Reasons to keep might include something like having used a more difficult to execute technique, or a colour scheme that is skillfully applied to enhance the mood of the piece. Reasons to eliminate definitely include factors like mouldlines, gap joins, and uninspired or poorly executed basing. In many contests bendy weapons, visible 3D printing artifacts, and similar factors that may be inherent to the material of the figure could result in elimination. Part of what is being assessed in competitive contests is not just the paint/conversion/assembly of your foundation surface, but the judgement you demonstrate in the selecting your surface. I also want to note that although most open show format contests use similar judging criteria, one show may have an overall more stringent or more easy-going standard than another. I was awarded Silver medals at the World Expo Open with figures that had been awarded Gold medals at the MSP Open and/or Atlanta figure show, and that was consistent with the awards I saw others receive. Gold medals were awarded to only the most exceptional work. All three of those shows use judging criteria based on the same system.
![]()
Belly Scales
One area that I did paint with a different technique than those used on the original figure is the belly scales. Drybrushing worked well to add highlights and bring out the texture of the main body scales. The belly scales are larger, smooth plates. As often happens on smoother surfaces, the drybrushing looks patchy. It was also harder to confine the lighter colours to smaller areas on the shapes of the belly scales, so I did not go very light in value, and there isn’t enough contrast.

For the revised version, I chose to make the belly scales look like they are striated. I painted the striations with overlapping dash brushstrokes, confining the lightest colour ones to smaller and smaller areas. This kind of texture is most easily painted with a fine-pointed sable brush, but I painted some of this with a synthetic brush. You can see the painting of the belly scales on the revision video. The striations are not applied in a super fiddly precise manner, and I don’t think you need to have developed amazing brush control to be able to paint this kind of texture. Once you get the hang of it you’ll likely find it isn’t as time consuming or persnickety as trying to paint smooth blends, so it’s a viable option for tabletop painting, too. If I were painting this as a high level contest entry, I would take more time and try to apply the dash strokes to the best of my ability. I also painted in some darker shadows where the belly scales overlap.
I think the use of the different technique on the belly scales adds visual interest to the revised version of the figure. Painting them with smooth blending and highlight edging would have accomplished a similar goal. We think of contrast most often in terms of dark/light, or one colour different to another, but texture is also a kind of contrast. We can use that contrast to help draw attention to a particular area of a figure. As viewers, we like looking at variation. Including different kinds of surface textures and/or application techniques on a figure makes it more interesting to look like.
Demonstrating an ability to paint different kinds of textures and effects is also advantageous for contest entries. In an open show format contest, it can increase the judges consideration of the difficulty, creativity, and workmanship of your piece. Judges in podium contests have similar concerns. Additional complexity and variety of texture on a figure could give judges a reason to keep it in the running for the final pool of consideration for awards.
![]()
Other Before and After Articles
If you’re looking to better understand common critique topics to improve your painting, you’ll find all articles related to that in the Common Feedback Issues Index. Below are links to other before and after comparison type articles that I’ve written.
